|
Are your windows leaking? Fix 'em quick, with these easy steps. What you will need
Remove the windows
After removing the nuts and bolts, carefully pry the old frames off. Be very careful not to bend the frames. You can see here that I tried keeping the screws with their original holes. This is a step that I later decided was useless. I needed to clean the old caulk off the screws, anyway. 
After removing the outside frames, and the old windows, the inside frames were still stuck as firmly as ever. I used the same techniques as for the outside frame, but by this time I had refined it a little. By sticking the paint scraper behind the frame, I had room enough to cut the old caulk with the spackling knife. This went a lot quicker and had less potential for bending the frame. 
By putting the inside and outside frames together, you can see how worn is the finish on the outside frames. Don't try to polish it, though. It's a clear anodizing and if you scrub that off, your corrosion problems will just get worse. Note also that the inside frames have washers jammed into them. These give you space to get a wrench or nutdriver on the nuts, and also make up for the differences in bolt length and cabin-top thickness. There's two or three washers for each bolt. Cut and fit the new windowsI neglected to take photos of this part. We traced the old windows onto the paper covering the new ones and used a jig saw to cut them out. Go slow, or the heat will cause the plastic to melt more than cut. Don't cut them oversize. It's better to make them slightly small rather than slightly large. You don't want them to bind in the openings, and it's difficult to trim them after cutting. Fit the new windows into the openings, making sure they don't bind at any spots. File them down if necessary. Put the frames on loosely with the bolts, but no nuts. Mark around the inside of the frames on both inside and outside of the cabin. Prepare the windows for caulking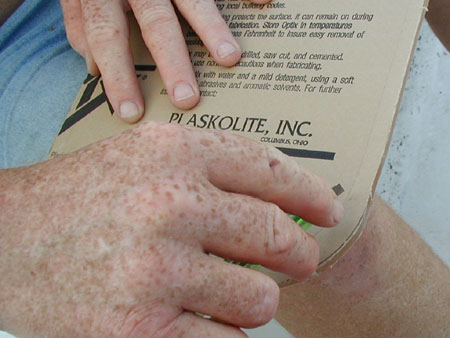
With a sharp knife, carefully cut the paper protecting the new windows along the marks you traced around the frames. 
Then peel the outer paper off the outside edges. On some boats, Whitby apparently installed the windows with protective paper still on the windows under the frames. As the paper deteriorated, these windows quickly developed leaks. 
Rough up the exposed edges of the windows with coarse sandpaper. These scratches will give the caulk a better surface for bonding, and will also create a longer path for any water to travel. Caulking and installing
Caulk around the openings. Use plenty of caulk and be sure to adequately cover the area around the screws. That's where my windows had been leaking. Don't worry about doing exactly the width of the frames. If you put enough caulk on, the excess will squeeze out. That's how you know you got enough. 
Install the outer frame with enough bolts to hold it in place. 
Caulk the inside of the outer frame. Again, use plenty of caulk. You want it to fill the gap around the window and to squeeze out when things are tightened down. 
Caulk the inside of both the window, and the cabin top. Again, use plenty of caulk and make sure you completely surround the bolt holes. 
Put on the inside frame and hand tighten the nuts. Install the rest of the bolts the same way. Then go around and tighten the nuts lightly, just snug, forcing out some caulk as you do so. Ideally there will be a little caulk squeezed out all the way around. Sometimes there will be a lot, but with practice you'll judge the right amount of caulk. It's a bad sign if none is squeezed out. Finishing up
Go have a beer. Let the caulk set up for a couple hours or more. Then trim the excess caulk with the sharp knife you used to cut the paper. Carefully tease up an edge of the paper and pull it off. It's beautiful! Have another beer to celebrate. Wait another day and then snug up the nuts slightly to put the caulk under compression. Hold the bolts still when you do this; you don't want them to turn and break the seal with the caulk. Don't overtighten, or you'll twist off the bolts. You're done. Enjoy your new windows. Prepare yourself for the shock of thinking your windows have fallen out, because they're now so clear you don't notice them. The outside world looks very different. The Chesapeake Bay Alberg 30 One-Design Association official apparel store.
|
|